Databases
SlashDB's core features center around databases. Both Data Discovery and SQL Pass-thru require connections to databases to function. This documentation will guide you through the process of creating and managing database connections.
Once a connection has been created and privileges assigned, users can browse the database using the Data Discovery option in the main menu. REST endpoints for databases are found under the /db URL.
Database Reflection
One of the most powerful and unique features of SlashDB is the ability to automatically discover tables, views and relations in databases. This discovery process is called database reflection.
Reflection happens when first creating a new database connection and every time a connection is initiated from the control panel. Databases may be configured to connect automatically when SlashDB starts, which also triggers the reflection process.
Database Connections List
The Database Connections page provides a list of all data sources available for viewing and interaction.
The list is accessible from the main menu (Database Connections) or from the URL /dbdef. It is only available to the admin user and users with privileges to view the list of databases. The admin user can access all databases; other users may be restricted to view only selected databases.
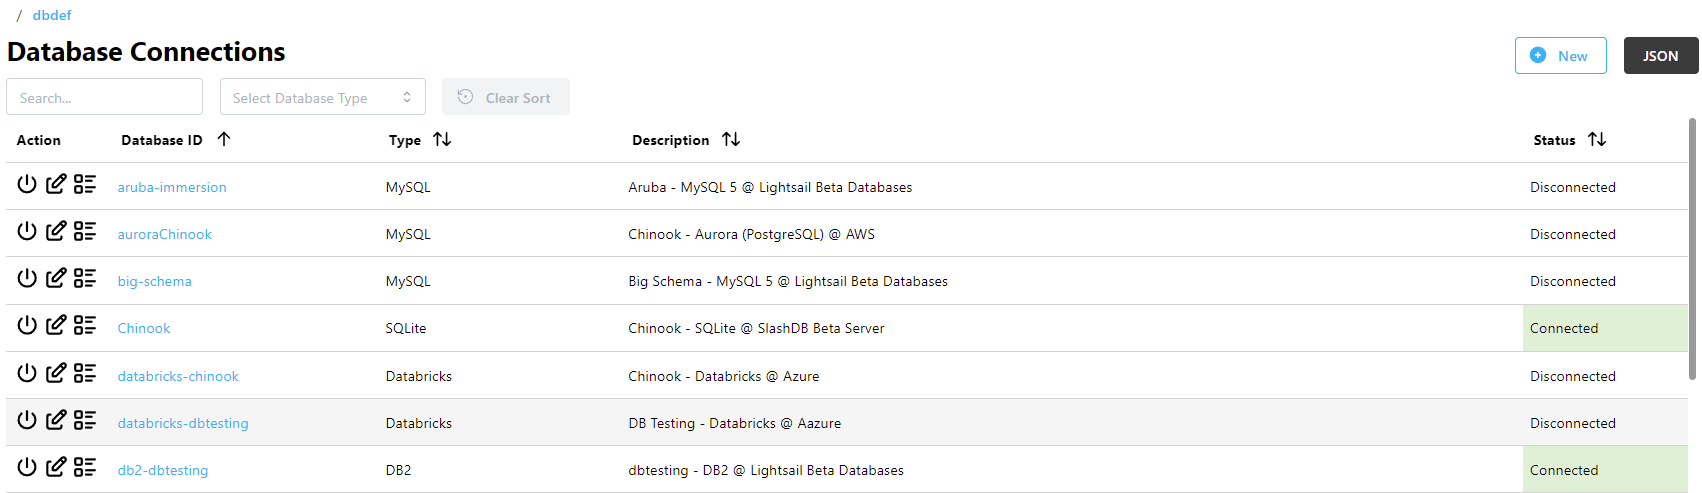
The list can be searched using the Search field above the list or sorted by clicking on column headers. The Select Database Type dropdown filters databases by type.
The Database ID is a unique identifier for the database which is used when making HTTP requests, e.g. these endpoints:
/db/Chinook/Customer- the HTTP endpoint for the Customer table in the Chinook database/dbdef/Chinook- the Chinook database connection configuration page
Each database in the list also has:
- the vendor Type of database
- a user-defined Description
- the Status of the database connection - Connected, Disconnected, Connecting, or Disconnecting
Info
The list can also be viewed in JSON format by clicking the button in the top right corner.

Actions
The Action column has 3 icons:
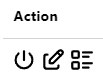
- To connect or disconnect a database, click on the Power icon.
- To view or edit a database connection, click on the Edit icon, or on the Database ID.
- To view more details about the Status, click on the List icon.
Connect a Database
Use the Power icon in the Action column to connect a disconnected database. The connection Status will change to Connecting, then to Connected once complete.
If the database was previously connected and the Cache Schema option is enabled in the database config, the schema may already be cached. If so, a dialog window will appear asking if you want to use the cache. The options are:
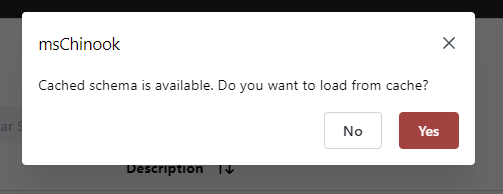
- Yes - load the cached schema from cache, which speeds up the connection process, or
- No - run the reflection process to rescan all the tables and views in the database
Important
If you have the Cache Schema option enabled and your database schema has changed (added or dropped tables, etc.), you should answer No to this prompt so that the latest changes to the database can be reflected.
If you close the prompt, the connection process is canceled.
Connection Failures
If an error is encountered while connecting to a database, the Status field will change to Failed.
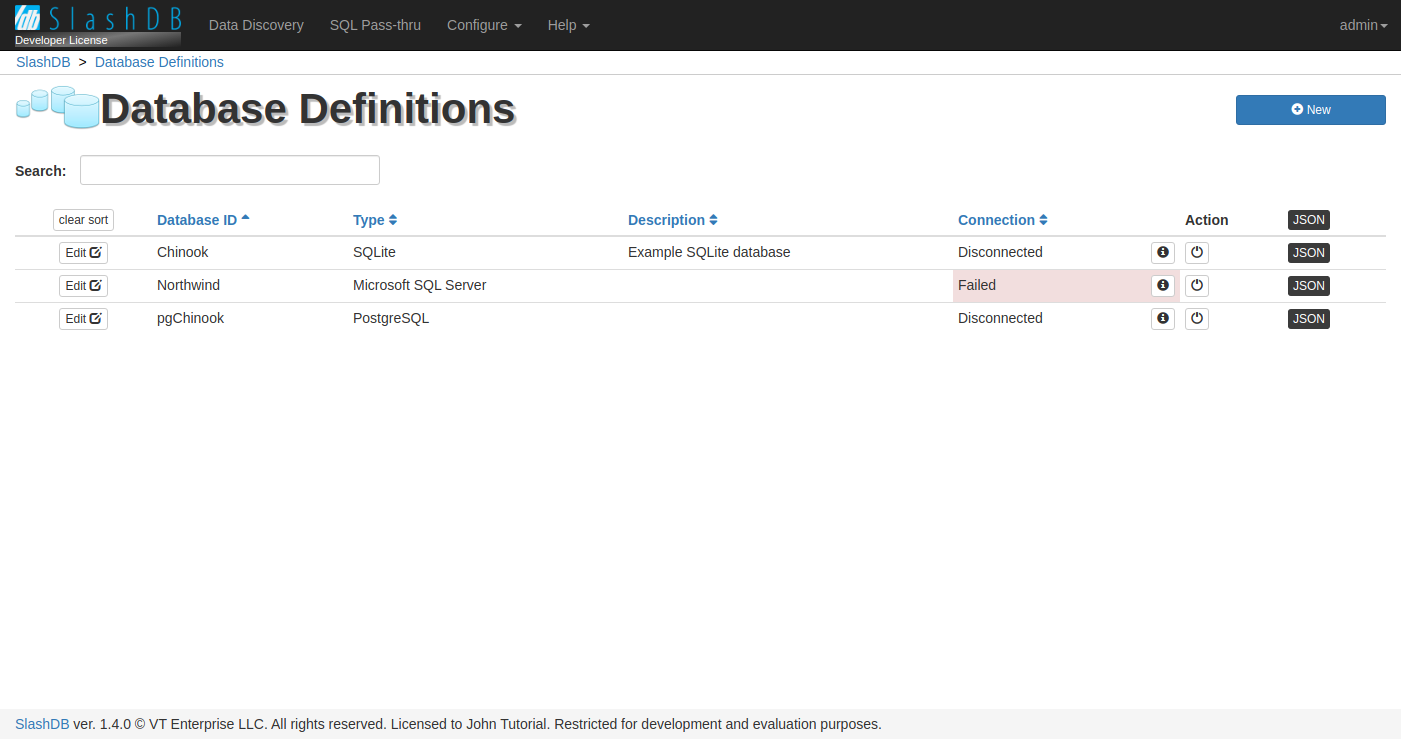
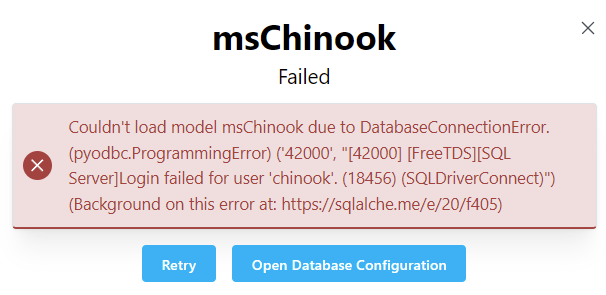
To see more details about why the connection failed, click the List icon in the Action column. A pane will appear on the right hand side of the screen with more information.
Tip
A failed connection usually occurs for one of the following two reasons:
- an error in the database configuration - check the database configuration for typos/errors
- network errors due to a firewall blocking access to the database - check your firewall settings and grant access from the SlashDB host to the host and port on which the database server is running.
You may need to ask your database and/or network administrator for help.
Disconnect a Database
Click the Power icon in the Action column to disconnect a connected database. The connection Status will change to Disconnecting, then to Disconnected once complete.
Adding a Connection
Editing a Connection
Click the Edit icon in the Action column to edit an existing database connection.
Database Connection Actions
Actions such as saving or deleting a configuration are performed using the row of buttons in the top right corner of the screen. Some buttons may not be enabled depending on the user's privileges.

The Connection Status button displays the current connection status. It operates identically to the Power icon in the database connections list. The button displays the text Connected on a green background when the database is connected, and Disconnected on a white background otherwise. You can click this button to toggle the status.
The Reflect Status button (list icon) will display a window showing the database reflection status when clicked.
The Close button will return to the connection list without saving.
Users with privileges to create connections will have the Save button available. This saves the current connection.
Users with privileges to manage connections will have the Delete button available. This deletes the current connection and returns to the connection list.
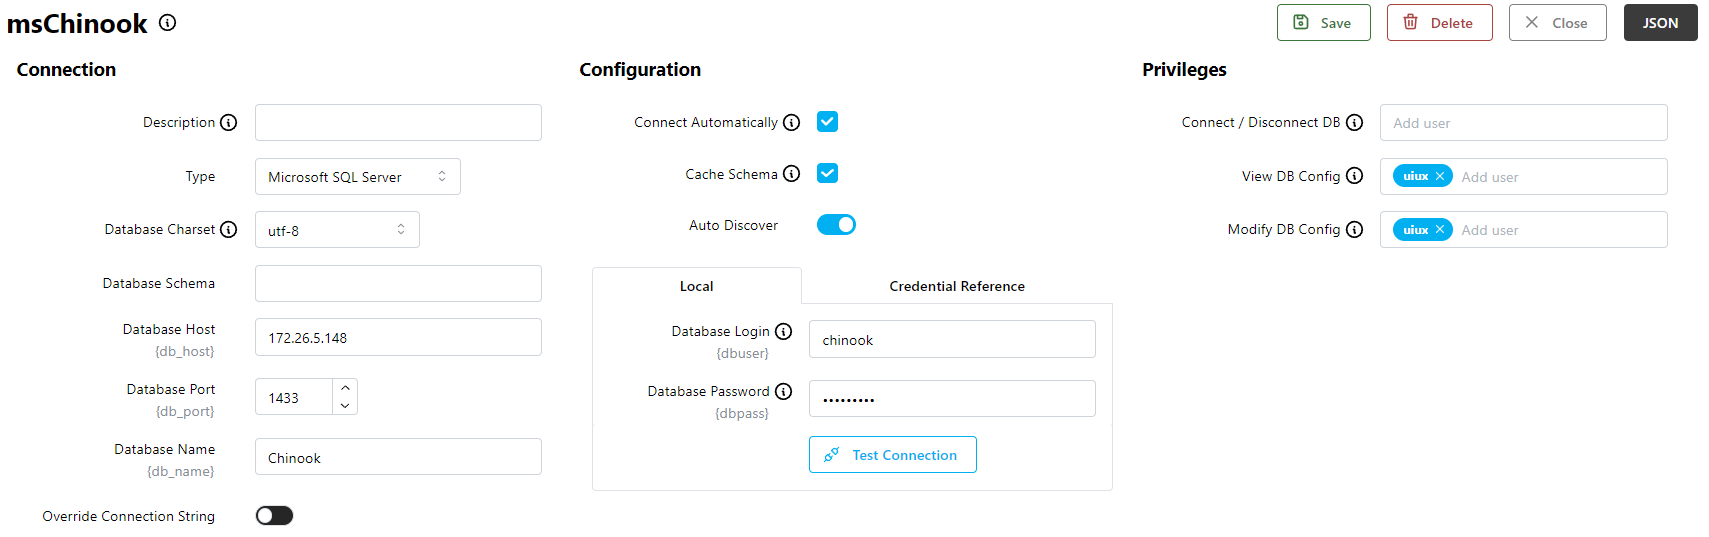
Configuration Sections
There are three sections on this screen:
- Connection is for updating the connection parameters like Database Host or Database Port
- Configuration is for configuring SlashDB features like Cache Schema, Auto Discover, and Database Login
- Privileges is for granting access to users to control the database connection, and view or update the configuration
Important
This screen may change for different database types. See Database Connectors for more information about configuring connections for specific database types.
Deleting a Connection
Click on a Database ID or the Edit icon to delete a connection. This opens the database connection configuration screen. Then click on the Delete button in the top right corner.
Adding a New Database Connection
The admin user can create a new database connection. Additionally, any user with privileges to do so may create new connections. Users with this ability will see the New button in the top right corner of the Database Connections list.

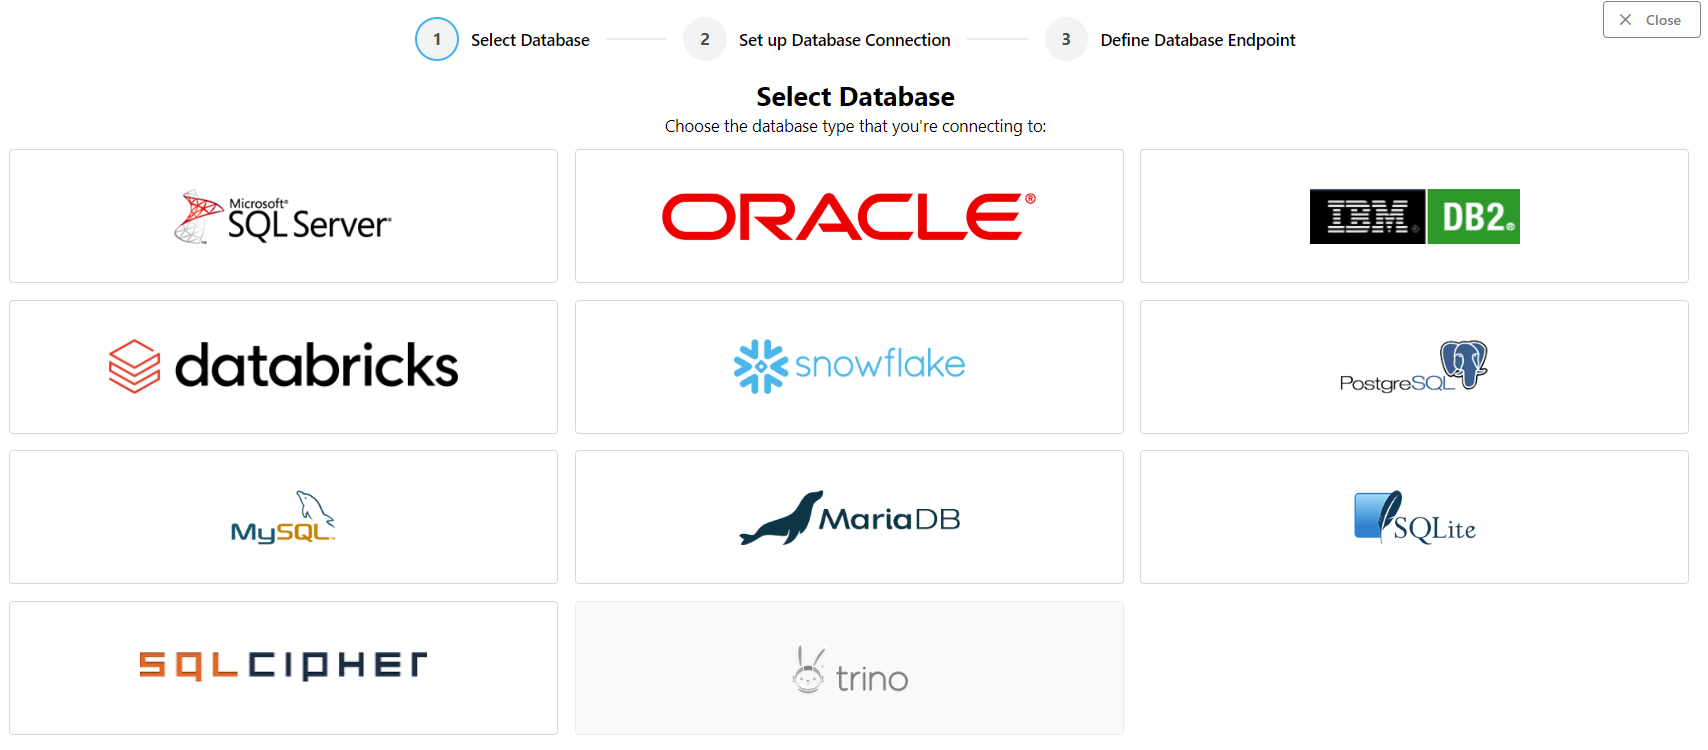
Clicking this button will launch the new connection wizard, starting with a list of different database vendors.
Choose Database Type
Click on the logo for the database type you want to connect to. Depending on your license, not all database types may be available.
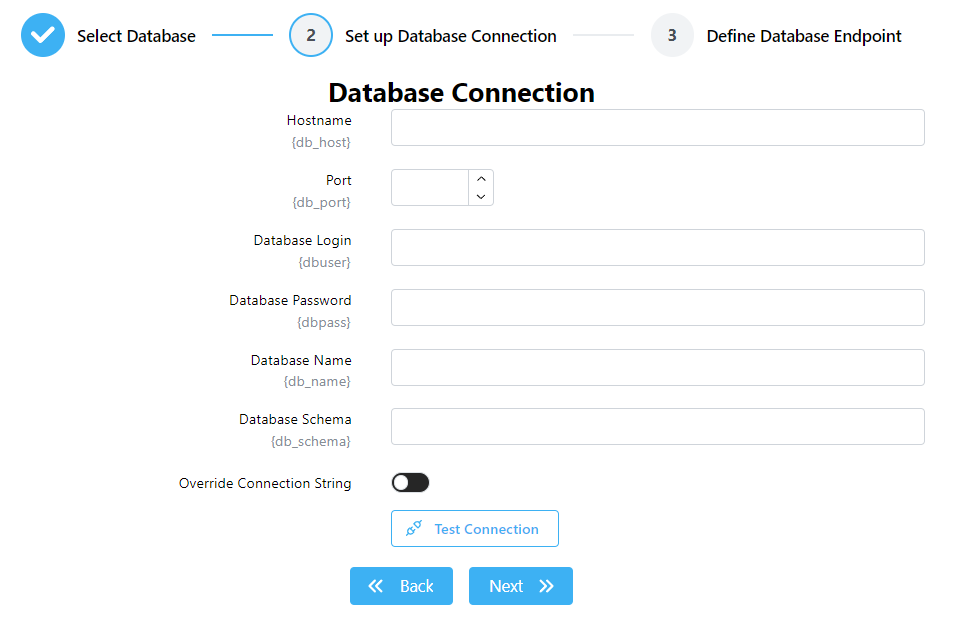
Configure Database Connection
The next screen contains a form with database configuration fields.
Important
Some of these fields can differ based on the database type. See the Database Connectors page for installation steps for each database type.
- Enter the Hostname or IPv4 address of the database server
- Enter the Port number that the database service is listening on
- For Database Login, enter a user account to authenticate the connection with
- For Database Password, enter the password for the user account
- Enter the Database Name of the database as configured on the server
- Enter the Database Schema of the database as configured on the server
Click the Test Connection button to verify that the database server is reachable. Click Next to go to the final step.
Important
The Database Login and Database Password in this step are only used during the initial scan of the database. It is recommended to configure user accounts for the database using Database Mapping or Database Credentials.
If the connection test fails, an error message with details will appear. You can proceed to the next step even with an error, but your database connection will not work until you fix its configuration.
Configure SlashDB Database Settings
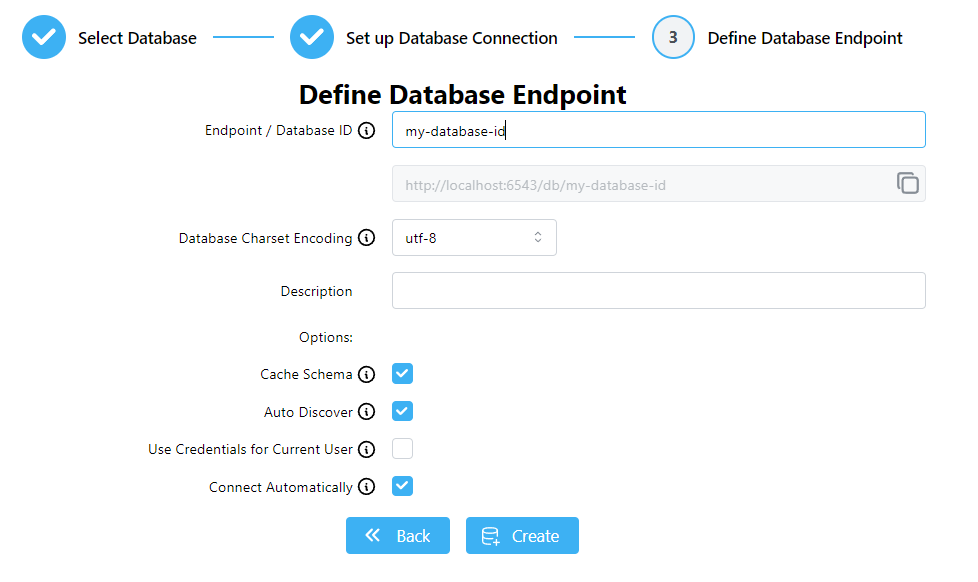
This form has fields for configuring how SlashDB will work with this connection.
-
Endpoint / Database ID - A unique name for the database, used in the endpoint URL and in other configuration contexts.
Important
Value for
Database IDmust start with a letter or an underscore, and may contain only letters, numbers or symbols:@,_,-, and~. -
Database Charset Encoding - The character set used for string types with this database.
- Description - An optional description for the connection.
-
Cache Schema - Set by default. Will cache the schema after the first connection so that subsequent connections complete faster.
Important
Whenever your database structure changes, you will need to disable this option, disconnect/reconnect, and then enable it again. If your database structure changes frequently, you may want to disable it entirely.
-
Auto Discover - Automatically find all tables and views in your database whenever SlashDB connects.
-
Use Credentials for Current User - Use the credentials of the user setting up this connection.
Tip
Learn more about configuring user credentials.
-
Connect Automatically - Automatically connect to the database whenever SlashDB starts.
Finish
Click Create to save the new database configuration and start connecting to the database. You will be taken back to the Database Connections list.
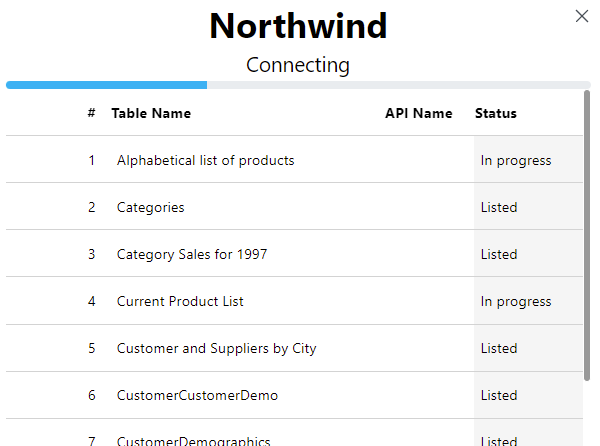
The reflection process may take some time, depending on the size and complexity of the database schema. You can see the reflection status by clicking the List icon in the Action column.
The status window will change to show the database is connected once reflection completes, or an error message if a problem was encountered.
Important
If you don't see all the tables and views you were expecting when the reflection process completes:
- check that the database user account has sufficient access for the tables and views
- check that the INI setting
sqlalchemy_sdb.reflect_nopk_viewsis True
Success
When process is complete, you can create database mappings and begin working with SlashDB.
Configuration File
All database configurations are saved in the YAML file /etc/slashdb/databases.cfg.
Caution
It is recommended to modify database configurations using the GUI whenever possible. Typos or formatting errors in this file may prevent SlashDB from starting.
Below you can a find a sample configuration for the Chinook database and details about attributes.
Chinook:
  alternate_key: {}
  autoconnect: false
  autoload: true
  autoload_user: {dbpass: '', dbuser: ''}
  cache_dbmodel: false
  connection: null
  creator: admin
  db_dialect: null
  db_driver: null
  db_encoding: utf-8
  db_host: null
  db_id: Chinook
  db_name: /var/lib/slashdb/sqlite/chinook.sqlite
  db_port: null
  db_schema: null
  db_type: sqlite
  desc: Example SQLite database
  excluded_columns: {}
  execute: []
  foreign_keys: {}
  read: []
  write: []
Each database configuration is defined under its unique ID - e.g. Chinook - and contains several attributes.
Attributes
alternate_key
Can be used to define primary keys for tables or views that do not have one, or to redefine a table's primary key. Each table is represented as an attribute, with the name of the column as a child underneath it, prefixed with a hypen.
Important
Value for alternate_key must start with a letter or an underscore, and may contain only letters, numbers or symbols: @, _, -, and ~.
Caution
Using this option with keys that are not truly unique may lead to unexpected results.
Example
Chinook:
  alternate_key:
    Customer:
    - LastName
autoconnect
Sets whether the database should be connected automatically when the SlashDB application starts. Can be true or false.
Example
Connect the Chinook database automatically on startup:
Chinook:
  autoconnect: true
autoload
Sets whether SlashDB should use its default reflection process when a connection is initiated. If set to false, SlashDB will attempt to load a model for the database.
Caution
This is an advanced feature. For more details, please contact techsupport@slashdb.com.
Example
Chinook:
  autoload: true
autoload_user
A dictionary containing the username and password for the database account that establishes the inital connection and runs the reflection process.
Example
Chinook:
  autoload: true
  autoload_user: {dbuser: 'john', dbpass: 'secretpassword'}
cache_dbmodel
This setting (referred to as Cache Schema in the GUI) controls whether a database schema will be saved to establish connections more quickly every time the database is connected. When enabled, cache files will be saved inside the caches_folder. It may be true or false.
If a cached schema is detected when the connection is initiated, a dialog window will appear asking if you want to use it.
Important
If you have the cache_dbmodel option enabled and your database schema has changed (added or dropped tables, etc.),
you should answer No to this prompt so that the latest changes to the database can be reflected.
Example
Chinook:
  cache_dbmodel: true
connection
Stores the value of the connection string override.
Caution
This is an advanced feature. For more details, please contact techsupport@slashdb.com.
Example
Chinook:
  connection: database.my-domain:1433/Chinook
creator
Stores the user ID of the user who created the database. This user is automatically granted permissions to read and modify the database configuration, as well as control the database connection.
Important
Value for creator must start with a letter or an underscore, and may contain only letters, numbers or symbols: @, _, -, and ~.
Example
User admin created the Chinook database:
Chinook:
  creator: admin
db_dialect
This setting is closely related to the database type (db_type). It allows you to override the default database dialect.
Caution
This is an advanced feature. For more details, please contact techsupport@slashdb.com.
db_driver
This setting allows you to override the default DBAPI driver that is used to connect to the database server.
Caution
This is an advanced feature. For more details, please contact techsupport@slashdb.com.
db_encoding
Sets the character set for encoding strings in the database. Not all character sets support diacritical marks or non-alphabetic languages (e.g. Japanese). Supported character sets are:
| utf-16-be | utf-16-le | utf-7 | utf-8 | ascii |
| big5 | big5hkscs | cp037 | cp424 | cp437 |
| cp500 | cp737 | cp775 | cp850 | cp852 |
| cp855 | cp856 | cp857 | cp860 | cp861 |
| cp862 | cp863 | cp864 | cp865 | cp866 |
| cp869 | cp874 | cp875 | cp932 | cp949 |
| cp950 | cp1006 | cp1026 | cp1140 | cp1250 |
| cp1251 | cp1252 | cp1253 | cp1254 | cp1255 |
| cp1256 | cp1257 | cp1258 | ujis | eucjis2004 |
| eucjisx0213 | euckr | gb2312 | gbk | gb18030-2000 |
| hz-gb-2312 | iso-2022-jp | iso-2022-jp-1 | iso-2022-jp-2 | iso-2022-jp-2004 |
| iso-2022-jp-3 | iso-2022-jp-ext | iso-2022-kr | iso-8859-1 | iso-8859-2 |
| iso-8859-3 | iso-8859-4 | iso-8859-5 | iso-8859-6 | iso-8859-7 |
| iso-8859-8 | iso-8859-9 | iso-8859-10 | iso-8859-13 | iso-8859-14 |
| iso-8859-15 | cp1361 | koi8_r | koi8_u | mac_cyrillic |
| mac_greek | mac_iceland | mac_latin2 | mac_roman | mac_turkish |
| ptcp154 | shiftjis | shiftjis2004 | shiftjisx0213 | utf-16 |
Example
Use the UTF-8 character set for the database:
Chinook:
  db_encoding: 'utf-8'
db_host
Sets the hostname or IPv4 address of the database server.
Example
Chinook:
  db_host: 10.1.2.29
db_id
Unique ID that is used throughout SlashDB to identify the database connection. Also used in REST API endpoints in Data Discovery (e.g. /db/Chinook)
Important
Value for db_id must start with a letter or an underscore, and may contain only letters, numbers or symbols: @, _, -, and ~.
Example
Chinook:
  db_id: Chinook
db_name
The value of the database name as defined on the database server.
Important
For Oracle databases, the value is here is the Service Name or SID, depending on your Oracle configuration.
Example
The Microsoft SQL Server hosted at 10.1.2.29 contains a database named Northwind:
Chinook:
  db_host: 10.1.2.29
  db_port: 1433
  db_name: Northwind
  ...
db_port
The port number that the database server is listening on.
Example
Database configured to accept connections on port 1433:
Chinook:
  db_port: 1433
  ...
db_schema
Sets whether SlashDB should use a specific schema on the database. Applicable for databases that support schemas like MSSQL, PostgreSQL, Oracle, or DB2. If not provided, a default user schema is used.
Example
Use database schema dbo when reflecting the database:
Chinook:
  db_schema: dbo
db_type
Sets the type of database server the connection is for.
Allowed values are:
sqlitefor SQLitesqlcipherfor SQLCiphermssqlfor MS SQL Serveroraclefor Oracledb2for IBM DB2mysqlfor MySQL or MariaDBpostgresqlfor PostgreSQLdatabricksfor Databrickssnowflakefor Snowflaketrinofor Trinoduckdbfor DuckDB
Example
The Chinook database is a sqlite database:
Chinook:
  db_type: sqlite
desc
Optional description of database connection.
Example
Chinook:
  desc: A sample music store database
excluded_columns
This option allows you to exclude certain columns from being discovered during the reflection process. Excluded columns will not be visible in Data Discovery, but can still be accessed in SQL Pass-thru.
Caution
Excluded columns should not be foreign keys in other tables.
Tip
When a primary key column is excluded, the entire table will be hidden. This can be used to hide tables in Data Discovery.
The format for this setting is a group of key/value pairs, where each key is a table name and each value is a list of column names.
Example
Exclude columns Company, Address and City from table Customer, and BillingAddress from table Invoice:
Chinook:
  excluded_columns:
    Customer: [Company, Address, City]
    Invoice: [BillingAddress]
Excludes the entire InvoiceLine table (InvoiceLineId is the primary key):
Chinook:
  excluded_columns:
    InvoiceLine: [InvoiceLineId]
foreign_keys
Caution
Deprecated. Should be an empty value or null.
Chinook:
  foreign_keys: null
read
A list of users allowed to view the database config. The admin user doesn't have to be added to the list because it has full access to all configs.
Important
All user names must start with a letter or underscore, and may only contain letters, numbers, and the symbols @, _, -, and ~.
Example
Only john, mike and admin can view the configuration:
Chinook:
  read: [john, mike]
write
A list of users allowed to modify the database config. The admin user doesn't have to be added to the list because it has full access to all configs.
Important
All user names must start with a letter or underscore, and may only contain letters, numbers, and the symbols @, _, -, and ~.
Example
Only john, mike and admin can view the configuration:
Chinook:
  read: [john, mike]
execute
A list of users allowed to connect or disconnect the database. The admin user doesn't have to be added to the list because it has full access to all configs.
Important
All user names must start with a letter or underscore, and may only contain letters, numbers, and the symbols @, _, -, and ~.
Example
Only john, mike and admin will be able change the state of the connection:
Chinook:
  execute: [john, mike]