Security
SlashDB uses a two-part security model:
- Authentication controls access to the API and GUI
- Authorization controls access to data
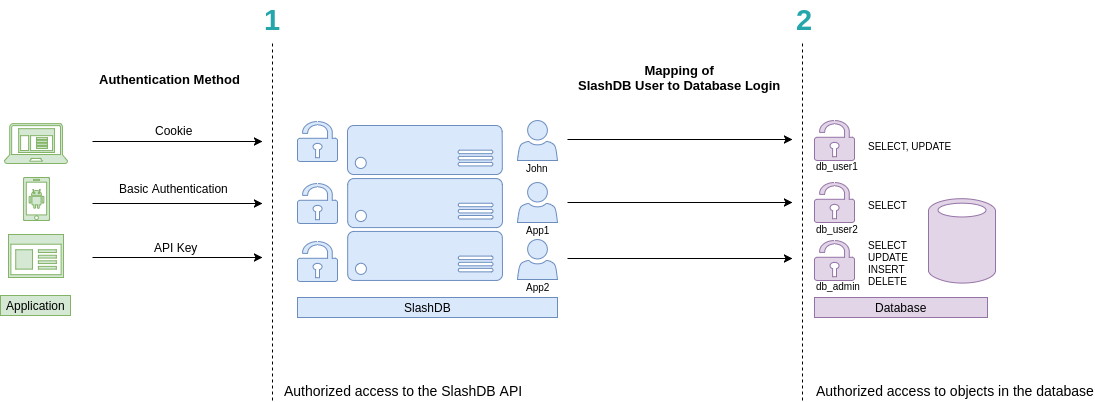
Each request to the API must be made as a specific SlashDB user. In the diagram above, they are John, App1 and App2. These users can be authenticated by passing valid credentials using one of these methods:
- HTTP cookies with a local user account or with Single Sign On credentials
- Basic Authentication
- API key
Info
Each SlashDB user (light blue in the diagram) can be mapped to a database login. Once a mapping has been created, the user can execute queries on the database with the privileges of the assigned database account (db_user1, db_user2 or db_admin, purple in the diagram). Database permissions are effectively passed on to the SlashDB user.
Scenario 1
John navigates to the SlashDB application using a browser. He logs in using his SlashDB username and password. He is identified as John and his browser receives a cookie. The cookie is sent with each subsequent request.
John's account in SlashDB has been configured to use the db_user1 database account when making queries. John can SELECT or UPDATE data, as those are the privileges for the db_user1 account.
Scenario 2
A mobile application sends SlashDB credentials using the Basic Authentication method. The credentials identifies the mobile application as SlashDB user App1, which uses the database account db_user2 for the database. App1 can only SELECT data.
Scenario 3
A backend process utilizes an API key to authenticate, which is sent with every request. The application is recognized as SlashDB user App2, which uses database account db_admin. This application can SELECT, UPDATE, INSERT and DELETE data.
System Accounts
SlashDB has two special system accounts, admin and public.
admin
The SlashDB administrator account admin has system-wide access to the SlashDB configuration.
public
Important
SlashDB treats unauthenticated requests as being sent by the public user.
You can set permissions for public just like any other user on the User Configuration screen.
For example, you can give public access to the Chinook database with a mapping.

Now that public has a mapping for Chinook, an unauthenticated request to the /db endpoint will return Chinook as an available database:
curl -i 'http://localhost/db.json'

HTTP/1.1 200 OK
{
    "Chinook": "/db/Chinook.json",
    "__href": "/db.json"
}
If you remove the mapping for Chinook, and public has no other mappings, the /db endpoint will return a 404 error:
curl -i 'http://localhost/db.json'

HTTP/1.1 404 Not Found
Warning: No models for user public.

{"http_code": 404, "description": "No models for user public."}
If you remove the public user, the /db endpoint will return a 403 Forbidden error:
curl -i 'http://localhost/db.json'

HTTP/1.1 403 Forbidden
Warning: Access was denied to this resource. Please log in with your username/password or resend your request with a valid API key.

{"http_code": 403, "description": "Access was denied to this resource. Please log in with your username/password or resend your request with a valid API key."}
Failed Authentication
Whenever a client sends a request to SlashDB with unrecognized credentials (e.g. an invalid API token) a 403 Forbidden response is returned.
The response Warning header will contain an error message, and the response body will contain the HTTP status code and the error message, in the same format as the request was sent.
curl -i "https://localhost/userdef/admin.json"


HTTP/1.1 403 Forbidden
Server: nginx/1.12.2
Date: Mon, 23 Sep 2019 08:56:41 GMT
Content-Type: application/json
Content-Length: 159
Connection: keep-alive
Warning: Access was denied to this resource. Please log in with your username/password or resend your request with a valid API key.

{"http_code": 403, "description": "Access was denied to this resource. Please log in with your username/password or resend your request with a valid API key."}
Info
More information about status codes can be found in sections about Client Errors and Server Errors.
HTTPS/SSL
It is strongly recommended to configure SlashDB to use SSL certificates to encrypt the communication between clients and the server.
To enable SSL, you will need:
- a private key and a certificate
- SSH access to the SlashDB deployment to upload files
- a modified NGINX configuration (
/etc/slashdb/nginx.conf)
Tip
Let's Encrypt is a certificate authority providing free SSL certificates. Visit the Getting Started page to find out how to correctly set up a free and renewable certificate.
Installing an SSL certificate
Once you have a private key and certificate for your domain, you only need to upload the files to the SlashDB server and then update the NGINX configuration.
For testing or development purposes only, you may generate a self-signed certificate. However, client browsers and REST clients will raise warnings about insecure communication.
Run the command below to generate a self-signed key and certificate and save them in /etc/slashdb directory
sudo openssl req -x509 -nodes -days 365 -newkey rsa:2048 \
-keyout /etc/slashdb/nginx-selfsigned.key \
-out /etc/slashdb/nginx-selfsigned.crt
Configuring HTTPS in NGINX
Add the NGINX directives listen, ssl_certificate and ssl_certificate_key to the NGINX configuration file /etc/slashdb/nginx.conf.
server {
    listen 80;
    listen 443 ssl;
    server_name your-slashdb-domain.com;
    ssl_certificate /etc/slashdb/nginx-selfsigned.crt;
    ssl_certificate_key /etc/slashdb/nginx-selfsigned.key;
}
Info
It's recommended to redirect traffic from HTTP to HTTPS. To do so:
- create an additional
serverobject in NGINX config that redirects clients to the HTTPS URL - comment out the
listen 80directive in the server with HTTPS configuration
server {
    listen 80;
    server_name your-slashdb-domain.com;
    return 301 https://$host$request_uri;
}

server {
    #listen 80;
    listen 443 ssl;
    server_name your-slashdb-domain.com;
    ssl_certificate /etc/slashdb/nginx-selfsigned.crt;
    ssl_certificate_key /etc/slashdb/nginx-selfsigned.key;

    location ~ /db*|/query* {
       uwsgi_pass              slashdb_app;
       include                 uwsgi_params;
    }
}
Then restart the NGINX server to apply changes:
sudo /etc/init.d/nginx restart`
Info
Remember to allow inbound traffic on port 443, especially for Microsoft Azure or Amazon EC2.
More info about configuring a server for HTTPS can be found in this tutorial.
AWS
Info
The AWS EC2 instances of SlashDB can be set up with an AWS Application Load Balancer to create a single endpoint for the service. AWS Certificate Manager can be used to easily manage SSL/TLS certificates.
For more information, read the AWS Application Load Balancer and AWS Certificate Manager documentation.
Cross-Origin Resource Sharing (CORS)
CORS is a mechanism that controls which origins (domains) are accepted by a SlashDB server and what HTTP methods and headers are exposed to those domains.
Those rules can be configured in the SlashDB INI Settings file /etc/slashdb/slashdb.ini in the section [filter:cors]. By default SlashDB comes with a free policy which allows traffic from any domain.
[filter:cors]
use = egg:wsgicors#middleware
# CORS available policies
# "free" policy
free_origin=copy
free_headers=*
free_expose_headers=Set-Cookie, Warning
free_methods=HEAD, OPTIONS, GET, POST, PUT, DELETE
free_maxage=180
free_credentials=true

# CORS enabled policies
policy=free
Info
Refer to wsgicors documentation for details on setting up CORS policies.